Linguistics classes usually do not require typed homework, but it’s always appreciated by graders, and often simplifies making changes later on. The short story is that you can manage all intro homework if you:
- Get the Doulos SIL font
- Copy and paste IPA, examples and rules from my quick template
- Draw syntactic trees with this website
- Maybe type more IPA with this other website.
But if you’re an advanced student or a comparison shopper like me, keep reading and you will find better options.
Contents
Phonetics
These two rows of IPA characters should match up.
![]() ʃʒ ɹɾ ʧʤ θð ɡŋ ʔ ʍ æɛɪɑʊ ʌɔɒɜ tʰ aː ṇ ˌσσˈσσ d̚ ɔ˞
ʃʒ ɹɾ ʧʤ θð ɡŋ ʔ ʍ æɛɪɑʊ ʌɔɒɜ tʰ aː ṇ ˌσσˈσσ d̚ ɔ˞
Fonts. The first step is to download a Unicode font with the IPA characters. Some fonts supplied with Windows, Mac or Office are supposed to work, but I’ve heard of glitches. So I recommend one of the following free fonts (view samples).
- Doulos SIL looks like Times New Roman. No bold or italic, but widely used. Recommended for compatibility’s sake. Different from SIL Doulos, an outdated non-Unicode font.
- Charis SIL is complete and professional. Recommended for good formatting.
- Gentium Plus (SIL) is compact and (too) pretty. No bold.
- Linux Libertine has a normal line-height, unlike the SIL fonts.
- DejaVu comes in Serif, Sans and Sans Monospaced.
Input. You also need a way to type IPA. Any of the following will work.
- Interactive IPA Chart (free website, no downloads necessary). Just click letters with your mouse, then copy the resulting text into your word processing program. Or if you’re only working with English data, then you may prefer the more compact TypeIt character picker. Recommended for intro classes.
- Various ways to type IPA in Word (free, no downloads necessary). AutoCorrect is a good medium-term solution but it seems to fail on me unpredictably. Insert > Symbol and Character Map are just stopgap measures.
- Keyboard layouts (some are free). With these you can type IPA into any program, which is important once you start using advanced linguistics software. For long-term use I recommend Keyman Desktop Light (Windows only, $19) because its poor cousin (MSKLC, free) activates unpredictably, and then you wonder why common letters don’t appear when you type them. I’d expect similar annoyances with the UCL keyboard layout (free).
Other useful links:
- My quick template (requires Doulos SIL) contains English IPA characters.
- J.C. Wells describes frequently confused IPA characters and SAMPA (plain-text IPA) among other resources.
- Wazu Japan’s IPA font gallery shows many other IPA-enabled fonts for the comparison shopper, such as Junicode (Victorian elegance, standard font for medievalists) and Code2000 (ugly as sin, incredibly complete).
- IPA transcription with SIL fonts is a general introduction from SIL, a Bible translation organization which provides many free resources for linguistics.
Phonology

Feature matrices can be copied and pasted from my quick template. You don’t really need the instructions below unless you want to get fancy.
- Equation (EQ) fields get lovely results and you won’t waste time on unnecessary tinkering, just some simple code. Note that you can’t imitate the { braces } in that code by typing them with your keyboard, you really have to do it the way the link says. Included in my quick template. Recommended.
- Box drawing symbols and tables. If you don’t want to cope with code, this method also works. Just note that you may need to right-click the table and select AutoFit > AutoFit to Contents when the alignment changes on you. Included in my quick template.
- Microsoft Word’s Equation Editor (go to section 6: pp. 15) is very slow on my computer and italics keep appearing. It’s not worth it — you can get equally elegant square brackets by using EQ fields.
Syntax
Trees require the right tools. It’s also a good idea to make test sketches before drawing them for real, whether on paper or on the computer.
- phpSyntaxTree is a free website which generates trees as images. You type your tree as bracketed structures, e.g. [top left right].
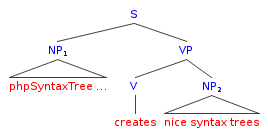
[S [NP phpSyntaxTree ...] [VP [V creates] [NP nice syntax trees]]]- Start by labelling words, e.g. [Adj happy] [N syntax].
- Check frequently by hitting the Draw button.
- Save the code somewhere in case you need to change your tree later.
- You can change settings, e.g. font, font size, color.
- You can add arrows later in Word using the Drawing toolbar.
- LATEX Previewer works similarly and provides truly professional-looking trees, though you have to work a bit harder to get the image into Word. First, click on the Packages button and move qtree from Available to Included. Now you can type trees using bracketed structures like \Tree [.top left right ] . To see the results, click Preview.
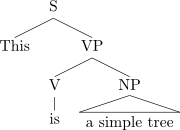
\Tree [.S This [.VP [.V is ] \qroof{a simple tree}.NP ] ]- Alert! Every closing bracket needs a space before it.
- You can insert line breaks using \\. You can also get spaces by enclosing the whole item in braces, e.g. {N\\Mickey Mouse}. (Otherwise the program thinks the space separates different items.)
- For more commands, including arrows, see the full documentation.
- The easiest way to get this into Word is probably to click Download, choose PDF format, then select and copy it in Acrobat.
- Tree-drawing programs are a good medium-term solution. I have no personal experience, but Mac users recommend Treeform (free). Other free options are reviewed at the link above (alongside other syntax-related software).
- Using Word tables to draw trees (go to section 5: pp. 10–15) is possible, but takes more time and effort than it’s worth. The same applies to using tabs.
- Arboreal font ($20). This dingbat font lets you make trees by typing instead of graphics. I use it because it’s faster than drawing and its sister font Moraic is enough for phonological trees, but I must admit it’s slower than phpSyntaxTree and the dedicated programs mentioned above.
- LATEX. In the end, all hard-core syntacticians seem to give up on Word and switch to LATEX, which is essentially a programming language, more powerful (i.e. harder) than HTML. See my guide for absolute beginners, which includes resources for linguistics.
Examples

Glosses like (1) above are crucial in syntax and morphology. They are best copied and pasted from my quick template (requires Doulos SIL) but the guide below explains additional functionality.
- AutoFit tables (go to section 3) are recommended. This link also describes simpler methods like fixed-width fonts and tabs, which are not recommended because they’re merry hell when you need to make changes later on.
- Word 2007 or later: Some table commands have changed. For the following tasks, first put your cursor inside a table so that the Table Tools ribbon will appear. Then:
- To AutoFit contents: Layout tab > Cell Size group > AutoFit drop-down menu > AutoFit Contents
- To remove borders: Design tab > Borders group > No border
- To view gridlines: Layout tab > Table group > View gridlines
Numbering. Linguistic examples are usually cross-referenced like this: (1), (2, 4), (3a), (5–7). The first kind (1) is easy to get.
- Word has built-in list numbering (go to section 3.3: pp. 7–8) which you probably use already, but it’s buggy. To avoid spaghetti numbering and document corruption, do it with styles as described here. This applies to non-linguistic wordprocessing too. Recommended for intro classes, and included in my quick template. Note that you can’t number table-formatted glosses this way or cite (2, 4), (3a) or (5–7).
Advanced numbering. There is no single best method of getting cross-references like (2, 4), (3a) or (5–7). Basically, the more accurate you want to be, the harder you’ll have to work.
- SEQ fields and bookmarks (go to the section on Example Numbering). This is the only absolutely reliable way to get 100% linguistics-style numbering for the tricky cases mentioned above. I didn’t want to believe it, because it’s one extra step (bookmarking) for every single example, but it’s true. Included in my quick template.
- LISTNUM fields (thanks Tamina Stephenson!) can do all the tricky numbering in a reasonable number of steps, but you’ll have to fix the Bullets and numbering settings whenever they reset themselves to look like (1)). An advantage or disadvantage compared to other field numbering methods is that when you insert cross-references, you’re choosing from a list with examples all mixed up with headings. Overall this is a good solution for long important projects, as long as you’re ready to fix settings (just one cosmetic edit will fix the whole document) when necessary.
- SEQ fields as captions (go to section 2: pp. 4–5) are the fastest way to do field numbering, but there are limitations because they automatically appear in the form (3. It’s easy to get (3a) by typing a) manually. But you have to delete the extra parentheses from (2, (4) and (5–(7) to get (2, 4) and (5–7), then lock fields to keep them that way before printing (see below), then remember to unlock fields later if your numbering changes. (Also, caption settings often reset themselves, but that’s okay: they can be fixed in seconds.) If you don’t need that kind of cross-reference this method is great. Otherwise, it’s a quick way to handle advanced homework, but all those separate manual edits might be slightly risky for long or important projects.
- Field shortcuts. If you use one of the field numbering methods above, you’ll want the following shortcuts. I’ve included Ctrl+A (select entire document) below because I’m assuming you’ll want to fix all the numbering at one shot.
- Refresh field numbering: Ctrl+A, F9
The number sequence will often be wrong until you do this. Nothing to worry about, that’s how it works. - Lock all fields: Ctrl+A, Ctrl+F11
For times when you have carefully deleted opening parentheses and don’t want them to come back (Word often refreshes field numbering unbidden before printing). Undo with Ctrl+A, Ctrl+Shift+F11. - Toggle field codes: Ctrl+A, Shift+F9
For hard-core users who want to edit field switches (options) manually. - Make AutoCorrect entry: Select field, Tools > AutoCorrect > Formatted text
This makes it much easier to insert field numbering the second time round. - Promote/demote list level: Alt+Shift+Left/Right
This changes the list level of a LISTNUM field, i.e. 1 (examples) vs. a (sub-examples). On some machines Tab/Backspace does the same thing.
- Refresh field numbering: Ctrl+A, F9
PDF files
Creating PDF files. If you are planning to email your linguistics work to anyone at all, the only truly safe way is PDF, because it preserves fonts and layout which can be crucial to understanding an analysis. Besides, Word documents can transmit viruses. There are many ways to convert them safely to PDF.
- PDFCreator (for Windows) installs a “PDF printer” so that you can make PDF files in any printing-enabled program. Many other programs do the same thing but this is the best one that’s free. Recommended.
- Mac OS X is PDF-enabled out of the box. Print preview from any program takes you to a PDF file which you can then save. Recommended.
- Save as PDF and XPS for Office 2007 or later is a free add-in from Microsoft. Fine for linguistics homework, but doesn’t let you make PDF files in non-Office programs, which is often useful in web browsing for instance.
- PDFTK Builder (for Windows) allows you to rotate, insert and delete pages, and to collate or split PDF documents. Very useful to me, but I don’t know if everyone else has the same needs.
Embedding fonts in PDF. Even after you install a PDF printer as described above, Windows’ default settings prevent proper font embedding, defeating the whole purpose of PDF. Fortunately it’s an easy fix.
- These instructions are written for physical printers, but it’s exactly the same for a PDF printer. Strongly recommended.
Hyperlinks and bookmarks in PDF. Word can generate quite a lot of useful hyperlinks automatically: cross-references, citations (depending on your bibliography management tool), even a table of contents. There are free modifications to Word which can preserve these hyperlinks; as a bonus, they also create bookmarks corresponding to headings.
- PDF-T-Maker creates a PS file. You can convert this into a PDF file by filling in the appropriate options in PDF-T-Maker (didn’t work for me) or just say yes when PDFCreator asks whether it should be associated with PS files. If you do it the second way, then each time you want a hyperlinked PDF file you (1) click the PDF-T-Maker button in Word, then (2) go to the folder and double-click the PS file to launch PDFCreator. Note: I have had a couple of strange error messages but everything has worked perfectly so far. The hyperlinks have yellow boxes around them which will not appear in printed copies.
- GhostWord seems to work in much the same way, but I have no personal experience with it.
- Save as PDF or XPS for Office 2007 comes direct from Microsoft. The good news is that there is no intermediate step of making a PS file before the PDF file. The bad news is that it’s said to slow things down drastically.